In this hands-on, the objective is to familiarize you with the Plain-text Markdown syntax and demonstrate the usage of MkDocs.
Overview of the Mardown Syntax
[Markdown] is a way to style text on the web. You control the display of the document; formatting words as bold or italic, adding images, and creating lists are just a few of the things we can do with Markdown. Mostly, Markdown is just regular text with a few non-alphabetic characters thrown #, * or _
Due to its simplicity, this format become more and more popular (for instance, you can use Markdown in most places around GitHub and Gitlab) but also in MkDocs.
Kindly take some time to read the following resources:
MkDocs
MkDocs is a free, static site generator geared towards building project documentation. It can be used to generate a stand-alone site, or just a documentation section of your project.
Because MkDocs produces static files from Markdown text files, your documentation is light-weight and easy to track using git, and easy to host using free services such as GitHub Pages and Read The Docs.
Installing MkDocs
To install MkDocs, you need to have Python and pip (a Python package manager) installed in your computer. They may already be installed on your computer. * If you have Python 3.4 or later installed, you probably have pip installed. (See the Python installation guide for full instructions.)
Install then mkdocs:
$> pip install mkdocs
Initiating new Documentation
Create a new project directory and initiate it
$> mkdir /tmp/myproject
$> mkdocs new  /tmp/myproject
Take a moment to review the initial project that has been created for you:
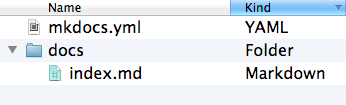
You will find
- a single configuration file named
mkdocs.yml - a folder named
docs/that will contain your documentation source files (markdown files*.md).- Right now the
docsfolder just contains a single documentation page, namedindex.md.
- Right now the
MkDocs comes with a built-in dev-server that lets you preview your documentation as you work on it. Make sure you're in the same directory as the mkdocs.yml configuration file, and then start the server by running the mkdocs serve command:
$> mkdocs serve
INFO    -  Building documentation...
INFO    -  Cleaning site directory
[I 161212 00:10:06 server:281] Serving on http://127.0.0.1:8000
[I 161212 00:10:06 handlers:59] Start watching changes
[I 161212 00:10:06 handlers:61] Start detecting changes
Open up http://127.0.0.1:8000/ in your favorite browser, and you'll see the default home page being displayed.
Update the theme
You may prefer (like us) the theme proposed by readthedocs.
So it's time to update the mkdocs.yml as follows:
site_name: My Docs
pages:
- Home: 'index.md'
theme: readthedocs
Notice that you did not had to refresh your browser to see the effect of your modifications. That what make it convenient
Hierarchical structure of your Documentations
Imagine that you setup a new experiment and document it
$> mkdir -p docs/exp/myexp
$> vim docs/exp/myexp/index.md     # Edit and document
Add it to mkdocs by just editing mkdocs.yml:
site_name: My Docs
pages:
- Home: 'index.md'
- Experiments:
  - 'My Experiment': 'exp/myexp/index.md'
theme: readthedocs
Access other documentations
You can quickly rebuild the documentation of this tutorial (as you would do in a RR context when pulling changes out of a project repository). Recall to stop the previous serving process.
$> cd RR-tutorials
$> mkdocs serve